

Wednesday, December 30, 2009
In 3 Days...
there will be an announcement for a HUGE Blog Candy giveaway to celebrate my Blogoversary! I want to reach 100 followers by my blogoversay, so tell all your friends to watch for the announcement.


Sunday, December 27, 2009
It's Pile It On week!
This week at Pile It On! requires you to use "clear" embellishments, paper, ribbon...whatever!
 This is the first time I've ever used a acrylic card. I tell you, it was fun! I am certainly going to make more.
Challenges for Jennifer:
- Pile It On - Crystal Clear- I used clear crystals and acrylic for the card
- Creative Card Crew: Anything Goes
- Charisma Cardz: Anything but Christmas
- Crafty Creations: No rules
- Crafty Ann's: Anything but Red and Green
- If the Shoe Fits: Color your world (use favorite medium...mine- colored pencils and Copics)
- Stamp Something: Holiday Somethings
- Quixotic Challenges: Lace
Thursday, December 24, 2009
Merry Christmas Stamps and Smiles challenge #46


.jpg)
When you play along with us, please remember to post your sample to your blog or gallery, and then include a link in the Mr. Linky form at the bottom of the post so we can all easily find each other. There is no time limit on our challenge, so please play along whenever you are able!! If you upload to SCS, please include “stampsandsmiles” in the keywords.
Stamps and Smiles stamps are not required for our challenges, grab some of your favorite stamps & supplies and have fun with our sketch each week!
Sunday, December 20, 2009
For the love of Papertrey Ink
Oh how I love thee! I just received my Papertrey Ink order in the mail yesterday. I was so excited, I had to open it right away. I ordered the new Signature Greetings and Say It With Style stamps. I'm always looking for great stamps with sayings, because I can never think of what to say in a card. I also ordered some Pure Poppy Ribbon in Swiss Dot and Saddle Stitch. I was in need of some red ribbon, and theirs matches their paper perfectly. The last item I ordered was a Fresh Snow ink pad. When I opened up the package, at first I thought it was a mistake...the ink looked like it was a tan color, I did not understand. Did it turn white after it was stamped? Was it dirty snow? I was so confused, I showed Jon and he held it up to the lamp and realized that the cover to the ink was tinted. So weird. So I had to try out my ink. I have been searching for a while for a really good white ink pad, and boy this one DOES NOT disappoint. The color is amazing, so bright and clear. Here is a The Angel Company stamp I used the Fresh Snow ink stamp pad on. I stamped it on Basics Kraft paper from Papertrey ink and colored it in with Copics.

Aren't the Copics AMAZING on this kraft paper! And with the white ink, they just POP! I added a little fun flock to the earmuffs, just because. If you are looking for a great white ink pad, please give this one a try, you'll love it too.
Thursday, December 17, 2009
Yea!! It's Stamps and Smiles day!
Give it a try! Play along!
Here's the sketch you need to follow:

Just use it as a starting point. Flip it if you want, Add more elements too!
When you play along with us, please remember to post your sample to your blog or gallery, and then include a link in the Mr. Linky form at the bottom of the post so we can all easily find each other. There is no time limit on our challenge, so please play along whenever you are able!! If you upload to SCS, please include “stampsandsmiles” in the keywords.
Stamps and Smiles stamps are not required for our challenges, grab some of your favorite stamps & supplies and have fun with our sketch each week!
Here is what I did:
Stamps and Smiles stamps are not required for our challenges, grab some of your favorite stamps & supplies and have fun with our sketch each week!
Here is what I did:
.jpg)
Tuesday, December 15, 2009
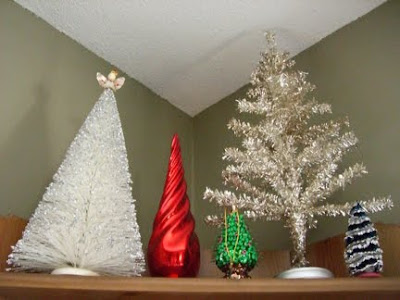
It's beginning to look a lot like a 50's Christmas
I love the 50's the art, the decor and the simplicity. It all started when my grandparents gave Jon and me their 1950's dining room table. Black and white, formica top with chrome legs and the leaf that unfolds in the middle of the table after you pull it apart. We love that table, and use it everyday. After we received that, I just knew I had to decorate 50's style. Most of the time it only comes out for holidays... but I am trying to gather more everyday 50's things as well.
I hope you enjoy looking at my 1950's christmas collection.
Please let me know if they bring back some memories for you!


Sunday, December 13, 2009
It's Pile It On week!


I had so much fun making this card. YES, it's metal tape again! This time I place the word "peace" in thickers on the chipboard before I covered the whole thing in the metal tape. Then using the end of a paintbrush (or large stylus) I molded the tape around the letters. Using Alcohol inks I covered the tape in reds and greens. After the ink dried, I sanded the letters to remove the ink from them. The most fun was adding Diamond Dust and vintage tinsel to the "snowflakes".
Challenges I used:
- Pile It On-Layered Chipboard
- Practical Scrappers - Anything Christmas
- Everybody Art - Red and Green
- The Pink Elephant-Favorite Christmas Color Combo
- Whimsy Stamps-Die Cuts
- Cuttlebug Challenges-Glitter
- Charisma Cardz-Red, Green and Silver
- If the Shoe Fits-Snow
- Hand Full of Stamps- Something Green
- Color Chef- Red, Green, White
- Stamp with Sarah Kay- Red and Green
- Creatalicious Challenges- Create something for Christmas
- Crazy 4 Challenges- Snowflakes/Snow
- Our Creative Corner- Holidays
- Secret Crafter- Snow
- Fun with Shapes and More- Snowflakes
- Sophisticat- X-Mas Theme
- Corrosive Challenges-Winter
- Paper Cutz-Snowman/Snowflake
- Gingersnap Creations- Winter
- Crafty Ann- Texture
Saturday, December 12, 2009
Hanukkah- Prickley Pear

Even though I am not Jewish, Prickley Pear asked me to make samples with the stamps they sell. Here is what I came up with, I decided to make a set of cards.
Here are the Stamps:
Star of David
Shalom
Menorah
Here's what you'll need to make them:
Supplies:
Paper} Solid: Blue-Papertrey Ink, White-Classic Crest, Patterned: Martha Stewart
Ink} Stampin' Up
Tools} Colorbok Gems,Offray Ribbon, Fiskars Treading Water Punch, Glossy Accents and Stampin Up Dimensionals
Here's how to make them:
Instructions:
I layered the patterned paper on the white card added a strip of the same pattered paper (behind where the ribbon will go). I coloring the stamp with Stampin' Up markers and then stamped it on the white paper and punched the bottom edge. I tied a ribbon around the edge of the card, over that small strip of patterned paper. I tied a bow around the edge of the panel with the stamping on it. I attached that panel onto the card so the bow lined up with the ribbon that was wrapped around the card. To finish it off, I accented the stamped image with glossy accents and added the gems to the bottom corner.
Prickley Pear Samples
This one is going to be a long one. I just realized that I forgot to post my samples for the last month. You find all of the stamps at the Prickley Pear Website.
-Thanks a Bunch-


-Thanks a Bunch-

Supplies:
Paper} Solid: grey-Archivers, rust-DCWV, white-Neenah Patterned: Neenah
Corrugated: Mohawk
Ink} Impress-slate grey, weathered wood and vintage photo distress ink-Tim Holtz
Tools} Copics, cotton string, Rubberstampede embossing pen, Hampton arts silver embossing powder, Heidi Swapp edge distresser, Family treasure leaf punch, acorns, Martha Stewart glitter, Stampin' Up mini clip
Instructions:
A2
Gather 2 acorns and glitter the nut part, while that is drying; stamp, color and hand emboss (using the embossing pen) the squirrel and cut him out. Punch about 8 leaves out of the PP and edge with the vintage photo ink. Cut a strip of rust paper and a piece of corrugated for the side panel. Cut a piece of rust slightly smaller than the card, and a piece of the white PP slightly smaller than the rust. Adhere the rust to the grey A2 card. Fold the white PP from the corner to add interest and distress with the weathered wood distress ink. Adhere that PP to the rust panel. Glue the smaller panels to the right side of the card. Place 6 leaves in a circle toward the bottom of that smaller layered panel. Mount the squirrel over the leaves with pop-dots. Mount the last 2 leaves to the left with pop-dots. Using the string, tie the acorn tops and cross the string around the card. Add the sentiment (printed on the computer) attaching it to the string with the mini clip.
-Merry Christmas-

Super simple Christmas card.
Supplies
Paper} all Papertrey Ink
Ink} Anarondack, Copics
Other} Sparkle gel roller, Diamond Dust
Instructions:
A2
Stamp ornament 3 times on PP, color with Copics and cut them out. Glue them to the Kraft paper. Outline the glued ornaments with a grey Copic to give dimension. Glue Diamond Dust to the decoration on the ornament. Add the "string" by drawing it with the gell roller. I hand wrote the sentiment, but if you had a stamp, that would work just as well.
-Ornament-

Supplies:
Paper} Solid-Chipboard, PP-Papertrey Ink, Vintage Sheet music
Transparency} PP
Ribbon} May arts
Ink} Tea Distress ink, Rock Candy-Tim Holtz
Tools} Copics, Wire, 100 wishes paper flowers, vintage buttons, cotton string, Crop-a-dile eyelets,vintage lace, Cricut (die-cut swirl)
Instructions:
Paper} Solid-Chipboard, PP-Papertrey Ink, Vintage Sheet music
Transparency} PP
Ribbon} May arts
Ink} Tea Distress ink, Rock Candy-Tim Holtz
Tools} Copics, Wire, 100 wishes paper flowers, vintage buttons, cotton string, Crop-a-dile eyelets,vintage lace, Cricut (die-cut swirl)
Instructions:
Colored PP transparency on back side with Copics, and mounted patterned paper behind image. Mounted that transparency onto the music paper, curling back the corners and distress inking the whole thing. Mounted that music paper on a piece of chipboard for stability, trimming to match shape of paper. Added the wire through eyelets, and decorated with flowers and ribbon. Painted the edges with Rock Candy to add a distressed look. Added lace, die-cut swirl and buttons to finish it off.
-Noel-

Supplies:
Paper} Solid: Burgundy-Colormates, Green and Cream-Archivers
Ink} Versamark, Black-Anirondack
Ribbon} May Arts
Tools} Copics, Prima White flowers, Stampin' Up embossing powder, Brads for JoAnns, Stampin' Up Dimensionals, Yellow Stickles, White gel pen and Smooch-White Pearl and Scarlet
Instructions:
A2
To get all of the elements together. I cut out 7 green squares 1 1/4" and 5 cream squares 1". I colored the white Prima flowers, one red and one green (to look like a pointsettia) with Copics. I added yellow stickles to the center of the yellow brads. As well as I pre-tied the ribbon into a bow.
Next I stamped the Cream squares with my stamps. I just lightly glued them to a piece of paper so they would stay together when I stamped them. After they were stamped I colored them with Copics and then glued them to the green squares. I also stamped one of the blank green squares with the holly stamp and colored it with Copics and Smooch. After I arranged the squares I stamped the dove with Versamark in the negative space and embossed him with clear embossing powder. To finish it off I attached the bow to the corner and glued the tails down, I also attached the Prima flowers together with the brads and glued them to a green square.
Friday, December 11, 2009
Blog Hop Winner!!!
Thank you all for joining the Stamps and Smiles Blog Hop! I have a winner for the Free Digi Set from Stamps and Smiles.
The winner is....

The winner is....

Scrapaddict please e-mail me (strickers7100@yahoo.com) so I can get the Believe in Magic set to you!
Have a great night!
It's Blog Hop time...win FREE digi sets!
Thanks for visiting, you should have arrived from Dalis's Blog! Isn't her work amazing!
 Oh boy it's a busy day! Along with the Blog Hop I get to giveaway a FREE digi set - Believe in the Magic. So don't forget to leave a comment and I will draw a name!
Now it’s time to start our Blog Hop/Release party. Play along and you could win the whole digi release. Visit the Design Team's Blogs, each girl has a fun giveaway waiting for you!!
Here we go…
Santa is stopping by each of the Design Team’s Blogs. The girls have written letters to Santa to take back to the North Pole, two of the letters are missing, do you know who?
Visit the Design Team in the order below and then email us your answer by 9 pm CST tonight. The Winner will be announced at 9:01pm. Just in case you get lost, here is the order of the blogs you will need to visit. Have fun!
For my project today I decided to make a T-shirt for my niece, Madeline. I used the Joys of the Season Digi Stamp and you can get it FREE on the Stamps and Smiles website! I colored this digi image in Illustrator and cut and paste a couple more birds. I then printed it out (mirror image) on T-shirt paper on my home printer. I followed the directions that come with the paper, press for 1 minute and then back-and-fourth for 3 minutes. I let it cool then I took off the backing paper. Look how cute! The little girl looks kind of like Madeline. I am going to give it to her for Christmas.

Subscribe to:
Posts (Atom)