
Wednesday, October 19, 2011
The Cuttlebug Spot is coming back!
Just wanted to let you know that we will be relaunching the Cuttlebug Spot November 1st! The first week is " Anything Goes" ..... it is our way to welcome back all our fans.

Wednesday, October 12, 2011
I'm still here!
Sorry guys I've been super busy. I am working part-time at October afternoon and it takes up a lot of my free time. I will get back to creating. I need to get back to creating.
In the mean time... October Afternoon is having a HUGE warehouse sale! I'd love to see you there.

In the mean time... October Afternoon is having a HUGE warehouse sale! I'd love to see you there.

Tuesday, October 4, 2011
How I made the Buck/Deer look 3-D
I've had a lot of requests to show how I did the buck on this Birthday card. I finally had time to edit the photos and here are the directions.


I used SU Dimensionals to put between the layers so they would "pop" off of each other.


Buck Card
Supplies:
Paper Solid: Cream- Archivers, Blue-Stampin' up
Paper Patterned: Making Memories "Just Chill in"
Ribbon: May Arts Tools: Prisma Colored Pencils, E57 Copic, Cricut-Accent Essentials Cartridge, Fiskars border punch, Brown StazOn and VersaColor Pinecone #171
Instructions:
I cut down the blue paper to A2 size. I cut down the plaid paper to be slightly smaller than the A2 card so when Its mounted to the blue paper you can see just a little of the blue border. I used the Cricut to make the plaque that is mounted behind the deer, using the Accent Essentials Cartridge Acct#48 at 4". I used my Copic to edge the plaque before I glued it down (I did not want to see the white of the paper). I also edged the small border that is on top of the sentiment block with the Copic. I printed the "Happy Birthday Dad" on my computer, the font is called Haettenschweiler. I edged this block in the VersaColor just to add some depth. I glued the border tot he edge of the sentiment block, added pop-dots and mounted it on the card under the deer. Added the woodgrain ribbon tied in a knot to the spine of the card.
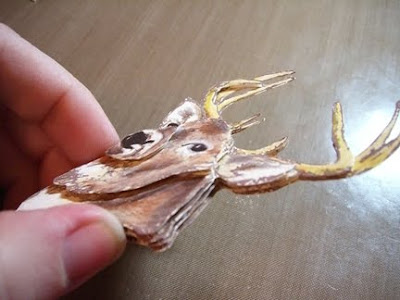
Here's how I did the Deer:

He is stamped 6 times on cream paper using brown Stazon. I colored all 6 of them the same using Prisma Colored Pencils. (There are an extra 2 on this sheet-the top corners. I was experimenting with how I wanted to color him.)


Next you need to cut out all 6 deer. I first cut out his nose, then the next layer is the nose, eyes and jawline. And so on and so forth, using up all 6 stamped images.


I used SU Dimensionals to put between the layers so they would "pop" off of each other.
You can purchase the Deer/Buck Rubber Stamp here.

Subscribe to:
Posts (Atom)