Showing posts with label alter. Show all posts

Wednesday, May 13, 2009

Altered Board Book Cuttlebug Challenge


Yep...that's me!


Paper: We Are Memory Keepers Vintage Brass Collection
Brown Ribbon: Stampin' Up
Hardware: Stampin' up Hodge Podge Hardware
Ink: Tim Holtz Distress Ink Vintage Photo
Butterfly Stickers: K&Co.
Rub-ons: American Crafts & Basic Grey
Other: Cuddlebug Die-Tag alongs

Images are from actual photos and others are taken from an old children's book

Sunday, April 19, 2009

Altered Book Club

Book #2 for Altered Book Club.

This month I chose Chris' book and the theme of her book is Autumn.


I wrote words that remind me of autumn on the back of the leaves.

The Poem by Charolet Flake Bates reads:

The heart of autumn must have broken here, and poured its treasure out upon the leaves.

Behind the tree I layered blue ribbon lightest to darkest to represent the sky and tore up pieces of tape this tape to look like fallen leaves.

Saturday, March 28, 2009

Altered Book Club

So I got sucked into another club. I don't know why I do this to myself. Probably because I am an artist, and love to share with other artists.

Besides all of the online card contests I enter, and the ATC (altered trading card, see older posts) I now am a proud member of a group held here.

Have you heard about Altered Books? Here's a great site to visit to find out more.

Anyway, I had Julie's book for the month and I chose "O" for my letter. Oh, the theme of her book is the alphabet (very partial to this theme) see this post I collect anything that has the entire alphabet on it.

So this is what I did for her book.


My name and letter choice for the front cover (this part of the book has the name a letter choise for everyone who's worked on her book).


Someone peaking through the faux wood tree. Whoooo could it be?


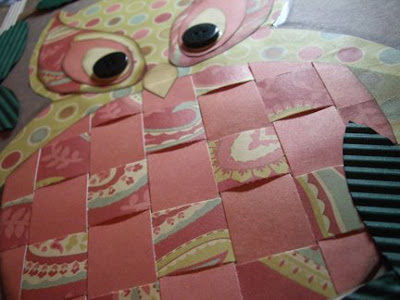
It is Mister Owl.
I think he turned out really cool...and he's one-of-a-kind. My husband drew him for me and I cut him apart and paper pieced him back together. And as you can see I weaved his chest. Really easy to do.


This is the back page (of the 4, I took up).


And this is what her entire book looks like. Jam packed with peoples art. How Fun!

(p.s. you might have seen that owl in other projects of mine. After he was done for this project, I scanned him into the computer and saved him as an image. For a recent card project I turned him pink.)

Saturday, March 21, 2009

Altered Board Book

I've always wanted to alter a board book. I went to my local thrift shop and bought one for 49¢. I painted the entire thing white (I used acrylic, but suggest Gesso). I recommend sanding the entire thing first, so your paint will stick (I should have done this but didn't).


Yep...that's me!


Paper: We Are Memory Keepers Vintage Brass Collection
Brown Ribbon: Stampin' Up
Hardware: Stampin' up Hodge Podge Hardware
Ink: Tim Holtz Distress Ink Vintage Photo
Butterfly Stickers: K&Co.
Rub-ons: American Crafts & Basic Grey
Other: Cuddlebug Die-Tag alongs

Images are from actual photos and others are taken from an old children's book

Monday, March 2, 2009

Typesetters Tray Scrapbooking Wall Art


When I saw this project on Ali Edwards blog, I knew I had to do it for myself. I already had the typecase (something I got for $2.00 at a thrift shop). A lot of our parents have one that they used to collect miniatures in, see if they still have it.

The main difference between the two of ours is, she decided to remove/add the dividers to make all the cubbies 2X2. I left mine as is, so I'd have a little difference from one to the other, I also left some squares empty so I can add new pictures if our family grows (kids, cats, whatever), and added embellishments/momentoes to some of my squares.

Tip: clean it really well, use a glue like Scotch (I really like this glue). And make a template of all of the cubbie sizes. That way you can just trace around the template on your image, cut it out, and it will fit.

I hope you can find (or have) yourself one of these and create this wonderful heirloom project for your wall.